HTTP Servers: Basic lesson
In this article, we will learn how to launch a simple HTTP server that responds with `Hello World!` text for all the requests. We will also dive deep into the Go HTTP server architecture.

What is an HTTP server?
This question might sound dumb to you because if you are here to learn about how to create an HTTP server using Go programming language, then you definitely have an idea of what HTTP servers are.
Nonetheless, an HTTP server is a program that listens for HTTP requests on a port of the machine with a static or dynamic IP address. The HTTP protocol is an internet protocol made up of TCP and IP protocols.
When a browser (client) makes an HTTP request to a machine with a given address and port, it sends the data in packets to the machine. These packets are assembled by the HTTP server and the server may choose to respond with some data requested by the client over the same request connection.
While creating an HTTP server, we need to make sure that we are binding the server on the correct port. If the port isn’t correct, then all the requests made by the client on the port won’t reach the server because the server is listening on some other port.
Also, a machine can have multiple addresses, like 127.0.0.1 (IPV4 loopback address which resolves to itself) or 192.168.1.1 or a static internet address like 10.10.1.1. An HTTP server may choose to listen on a specific address or perhaps, all the machine addresses using 0.0.0.0 address.
Built-in tools
Go provides the net package that contains the utility packages to handle networking related stuff. This package contains the http package which is used to create HTTP servers and to make HTTP requests as a client. It also has the smtp package to send emails using SMTP protocol.
💡 The net package also has other sub-packages and APIs for various kinds of networking stuff. Use this link to find out about sub-packages provided by net.
The http package
The http package is a built-in package (provided with the standard library) to make HTTP requests (as a client) and listen to HTTP requests (as a server). Unlike another programming language, the same http package provides the APIs to create HTTPS secure servers (we will look into later).
Since this package is a sub-package of the net package, the typical Go import path will be as follows.
import "net/http"
Creating a simple HTTP server
The http package gives us some APIs to create a simple HTTP server.
The ListenAndServe function
This package exports a ListenAndServe function with the below signature.
func ListenAndServe(addr string, handler Handler) error
This function starts an HTTP server and locks the process. It starts to listen to incoming HTTP requests and serve requests using Serve function under the hood. It may return an error in case the server could not be started.
💡 You can read more about ListenAndServe function from this documentation.
Since this function locks the process, any code below this function call will not be executed. The process will be terminated if it returns an error or if the process is killed using a keyboard interrupt (using ctrl+c).
Let’s understand the arguments of this function.
The addr argument of type string is the address of the machine on which the server will be spawned. It is the combination of IP address and port which looks like "<ip-address>:<port>". We can use ":<port>" as well without an IP address in which case it will be reachable from all the addresses of the machine.
The handle argument of the type Handler interface handles the incoming HTTP requests. The Handler interface looks like below.
type Handler interface {
    ServeHTTP(ResponseWriter, *Request)
}
We have learned a lot of interfaces in the interfaces lesson. We can pass a value of the type that implements this interface as an argument to the ListenAndServer function.
💡 We are allowed to pass nil value (zero-value of the interface) as the value of handler argument. But we will dive into that later.
ServeHTTP method of the Handler interface
When the HTTP server is started by invoking ListenAndServe(addr, handler) function, any incoming HTTP request will trigger the ServeHTTP method of the handler argument.
The main job of ServeHTTP method is to respond to the request with some data. This method has the following signature.
ServeHTTP(res http.ResponseWriter, req *http.Request)
The res argument contains the response object of interface type ResponseWriter which has the following description.
type ResponseWriter interface {
    Header() Header
    Write([]byte) (int, error)
    WriteHeader(statusCode int)
}
This interface defines the Write method which is used to write data to the HTTP response. It also has other methods to add an HTTP status code and manipulate response headers.
💡 You can read about ResponseWriter interface from this documentation.
The req argument contains information about the HTTP request made by the client. It is a type of Request struct and it is a pointer. This object contains information about request headers and data (payload) sent by the client.
💡 You can read more about Request struct type from this documentation.
Writing a “Hello World” server
Now that we have pieces of the puzzle, let’s combine them together and create a simple HTTP server that responds with Hello World! text.
Let’s write the response handler of type Handler first.
// create a handler struct
type HttpHandler struct{}
// implement `ServeHTTP` method on `HttpHandler` struct
func (h HttpHandler) ServeHTTP(res http.ResponseWriter, req *http.Request) {
    // create response binary data
    data := []byte("Hello World!") // slice of bytes
    // write `data` to response
    res.Write(data)
}
Now that our handler is ready, let’s call http.ListenAndServe method with the handler on address :9000.
func main() {
    // create a new handler
    handler := HttpHandler{}
// listen and serve
http.ListenAndServe(":9000", handler)
}
In the above program, we have created an instance of HttpHandler struct. Since this struct does not have any fields, we did not initialized any.
Then we passed handler to the ListenAndServe call. The handler argument is valid because it implements ServeHTTP method which means it implements the Handler interface which is the type of argument.
These pieces can be combined together to form a complete HTTP server.

To launch the server, we just need to run this program using go run.
$ go run go-server.go
This command will execute the main method of our program. Since the main method contains the http.ListenAndServe call, it never exits and process remains locked until we terminate it forcefully, which is good because we want the HTTP server up and running all the time.
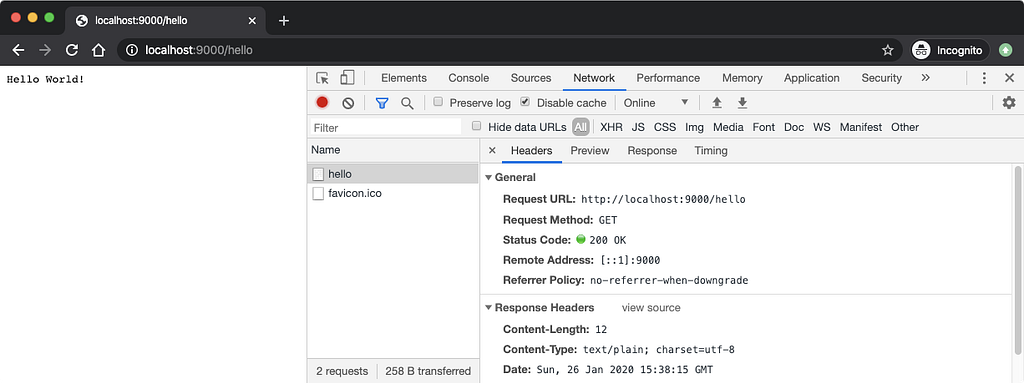
Let’s open up the browser and visit URL http://127.0.0.1:9000. Since our server is running on :9000 address which loosely translates to 0.0.0.0:9000, our server will be able to respond to the request.
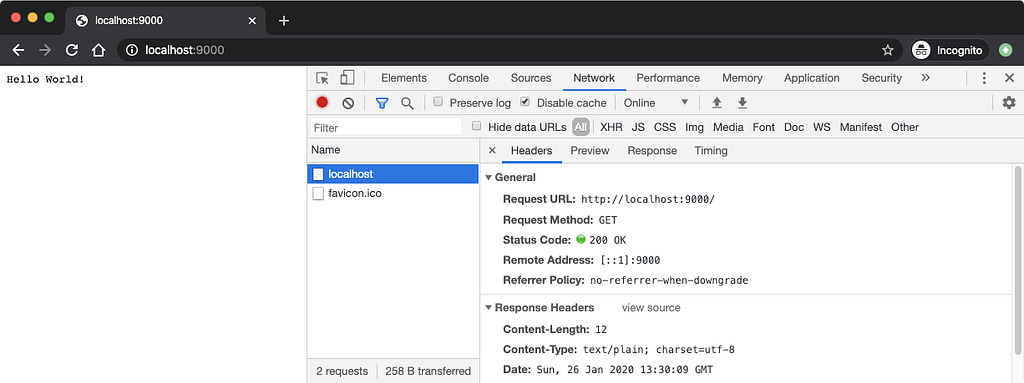
If you look at the response headers sent by the server, we don’t much except some default ones added by the Go server under the hood. Since the Content-Type response was not explicitly set, Go set it to text/plain from the information it had from the res.Write call.
Let’s visit another URL, for example, http://127.0.0.1:9000/bla/bla and see what our server responds with.

As you can see from the above screenshot, we get the same response for any kind of URL combination even for the /favicon.ico request made by the browser automatically. This is because ServeHTTP method of the handler is getting invoked for all the requests (we will fix that later).
Let’s understand more about ServeHTTP method. As we are sending raw bytes as a response using res.Write() method call, you may wonder, does this call end the request?
The answer is no. We can make as many Write calls as we want. The request is sent when ServeHTTP method exists. Also, the Write method signature of ResponseWriter interface is as follows.
Write([]byte) (int, error)
It returns the number of bytes written to the response and an error if Write() call fails. We can simply ignore these values but the number of bytes written can be useful to send Content-Length response header.
💡 Content-Length header is set by the Go under the hood if the data are written to the response in few KiloBytes but we can override its value.
The cool thing is, the Writer interface also defines the Write method with the exact signature. Hence, res object which is a type of http.ResponseWriter interface can be treated as Writer (polymorphism).
The io built-in package provides the WriteString method which can write a string to the object of type Writer.
func WriteString(w io.Writer, s string) (n int, err error)
Also, the fmt package provides the Fprint and Fprintf methods to write any values to a Writer object.
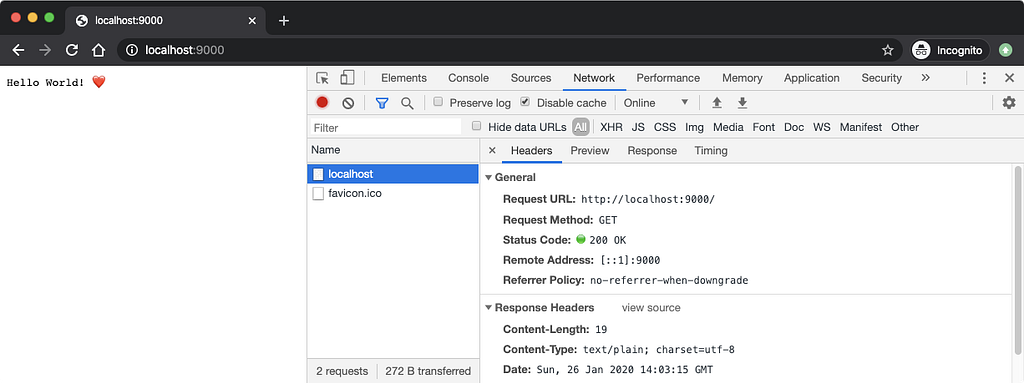
func Fprint(w io.Writer, a ...interface{}) (n int, err error)Let’s modify the ServeHTTP method to make use of these features.
func (h HttpHandler) ServeHTTP(res http.ResponseWriter, req *http.Request) {// write `Hello` using `io.WriteString` function
io.WriteString(res, "Hello")
    // write `World` using `fmt.Fprint` function
    fmt.Fprint(res, " World! ")
    // write `❤️` using simple `Write` call
    res.Write([]byte("❤️"))
}
In the above modification, we are making multiple Write() calls on the res object, two implicitly and one explicitly.
Now that we have a good understanding of how to launch an HTTP server in Go, let’s move on to some advanced configuration.
Understanding ServeMux
The ServeMux is a built-in struct type exported from the http package, that acts as HTTP request multiplexer. The handler argument of the ListenAndServe call we saw in the previous example is also kind of a multiplexer because it handles all incoming HTTP requests.
We can create an instance of ServeMux and pass it as the handler to the ListenAndServe() call. This can be possible because ServeMux implements the ServeHTTP method which will make it implement the Handler interface.
So why we need this ServeMux struct type if our custom HttpHandler struct type used in the previous example can do the job? The problem with ServeHTTP method of HttpHandler is that it responds to all the requests.
If you are a web developer, then you always make precise requests to get a specific response, for example, /index.html to get HTML document and /styles.css to get CSS stylesheet.
However, so far, we do not have that granular control over our server and it responds to all the requests with the same response. One modification we can do inside ServeHTTP method is to check for the request URL using req.URL value and return custom response but that’s not pretty.
What we need is a route based control where different functions take the responsibility of handling the response of different URL paths AKA routes. ServeMux can accept a function for a specific route and when incoming request URL matches that route, that function will be executed.
The way ServeMux does is to check if the incoming request matches the route it has, as close as possible, and then execute the function it has associated with that route to handle the response.
For example, if ServeMux has /api/ route and /api/users route and a client makes an HTTP request with :9000/api/users URL, the handler function registered with /api/users is called since this route has a better match with the incoming request.
Otherwise, /api handler function gets executed when a client makes an HTTP request with :9000/api URL or :9000/api/bla URL.
Alright, enough about theory. Let’s implement a ServeMux with our existing example. But first, let’s understand ServeMux APIs.
type ServeMux struct {
    // contains filtered or unexported fields
}
As you can see from the above code, the ServeMux is a struct type and it contains unexported fields. These hidden fields contain the internal logic of storing the route paths and handler functions along with some other data.
To get a ServeMux instance, we need to call http.NewServeMux function. This function returns an instance of ServeMux with the loaded capability to handle requests based on routes.
mux := http.NewServeMux()
💡 Internally, NewServeMux returns the new pointer instance of ServeMux using new(ServeMux) function call. We can also use mux := &http.ServeMux{} syntax to do the same thing. The reason why we need a pointer because its method has pointer receiver and we are passing it as interface of Handler type. This concept has been discussed in the interfaces lesson.
ServeMux also implements the ServeHTTP method which makes it a perfect candidate to be passed as the handler for ListenAndServe call. The ServeHTTP method implemented by the ServeMux does the calling of suitable handler function for the incoming request based on the URL route pattern.
But first, we need to register a route pattern and its corresponding handler function. ServerMux provides the HandleFunc method just to do that. The syntax of this function is as follows.
HandleFunc(route string, handler func(ResponseWriter, *Request))
After all the routes and their corresponding handler functions are registered with our newly created mux ServeMux object, we can pass this object to the one and only ListenAndServe call that starts our server.
ListenAndServe(addr, mux)
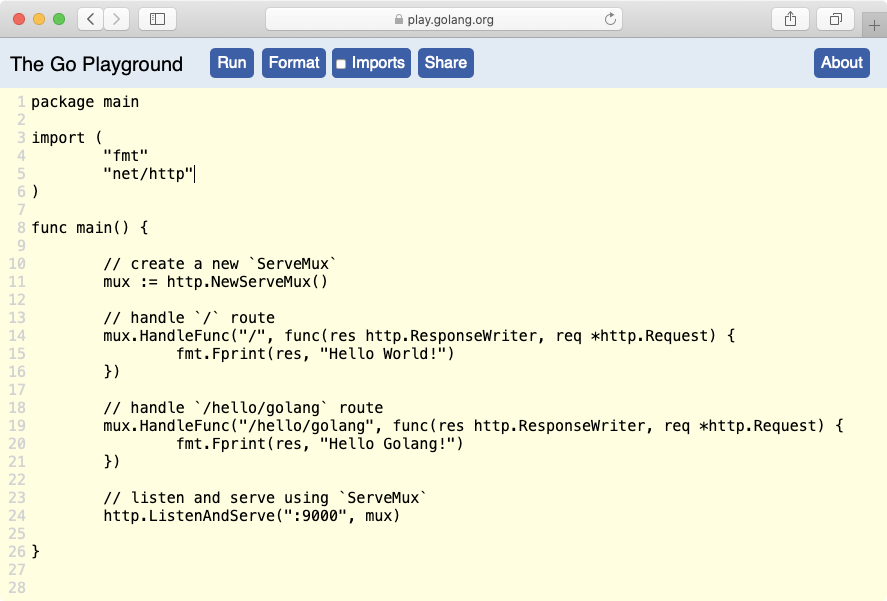
In the above example, we have created a new ServeMux object to handle all incoming HTTP requests. Then we added two handler functions for / and /hello/golang routes to respond to the HTTP requests received by the mux.
When you visit the http://127.0.0.1:9000/hello/golang URL from the browser, the handler function registered with /hello/golang is executed.
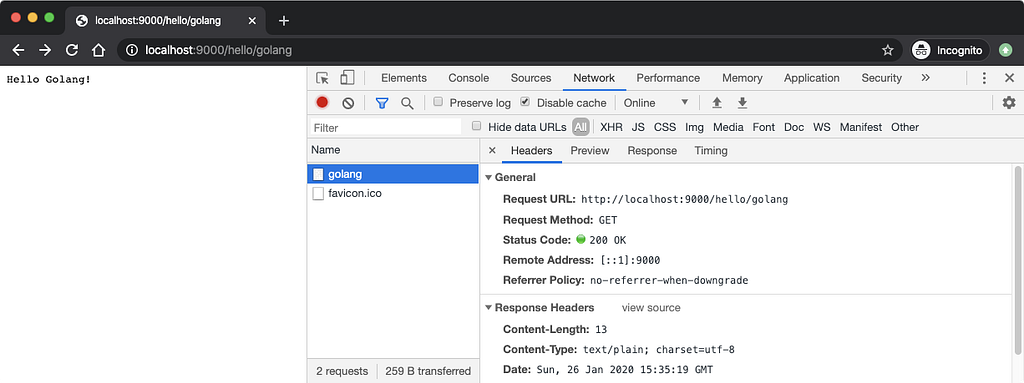
If the URL is other than the above one, the handler function registered with / is executed even when /hello/gola or /hello URL path is used.
This is because ServeMux can match the incoming requests by looking at the parts of the URL separated by / character. Since /hello/gola doesn’t match golang in /hello/golang, it will fall back to /hello handler. And since we don’t have handler registered with /hello, it will fall back to / handler.
💡 We can create custom route handling logic using Handle and Handler methods of ServeMux but we can cover that in the advanced lesson.
Using http.DefaultServeMux
Remember, I earlier said that you can pass nil as the value of handler to the ListenAndServe function. When we pass nil, Go will internally use the http.DefaultServeMux which is a global ServeMux instance. This will make our life a little easier as we don’t have to create ServeMux manually.
We can add routes and handler functions to this instance using similar methods but using the functions exposed by the http package.
The HandleFunc function provided by the http package does the exact same thing that the mux.HandleFunc does. It adds a handler function to the http.DefaultServeMux to handle HTTP requests of a specific route path.
Let’s rewrite our earlier example by passing a nil handler.

The modified example above will behave exactly the same as the previous one. This time, we avoided the step of creating a custom ServeMux to handle the incoming HTTP requests and used the default one provided by the Go.
💡 We can also use the Handle function to get more granular control over the request resolution, but we will also look into it in later lessons.
Returning a better response
So far, our server has become capable of handling routed requests but we haven’t improved our response structure significantly. A normal HTTP response contains headers to inform the browser about the response.
Let’s see how we can add some header values in the response and change the status code of the network response as well.
The ResponseWriter interface has some cool methods.
- The ResponseWriter.Header() returns the object of Header type. This object contains the map of header keys and values. We can use Add, Set and Del methods to manipulate the response headers. We can use the Get method to read existing response headers.
- The ResponseWriter.WriteHeader(int) method writes the HTTP status code header to the response. However, this method is called implicitly by Go when first ResponseWriter.Write() call is made with status code 200 (http.StatusOK constant value). We should pass valid HTTP status integer code or use constants provided by the http package.
💡 We can also access the Request headers from the Request argument of the handler function. The request headers can be accessed from the Header property.
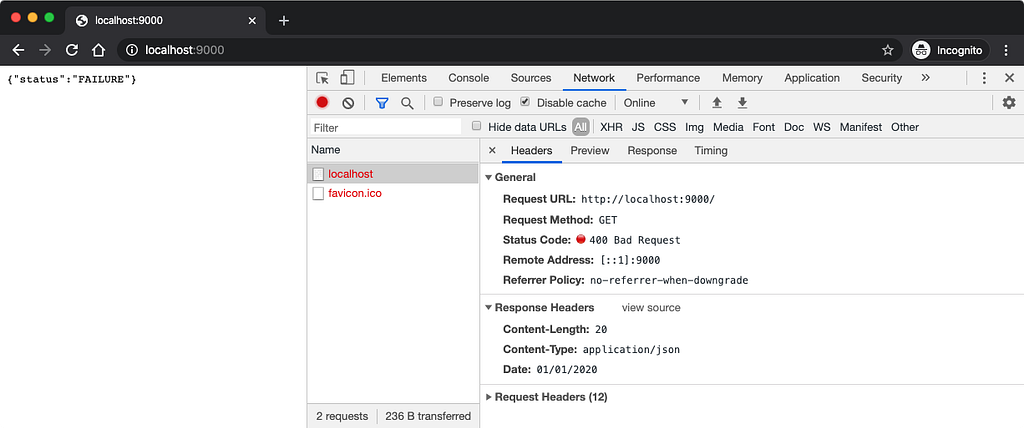
Let’s add a Content-Type header and reset the Date header from the response. This time, we will send a JSON string as a response. To notify the browser that the incoming response is of the JSON type, we will use application/json as the value of Content-Type header.
We will also inform the browser that the request failed with 400 status code.
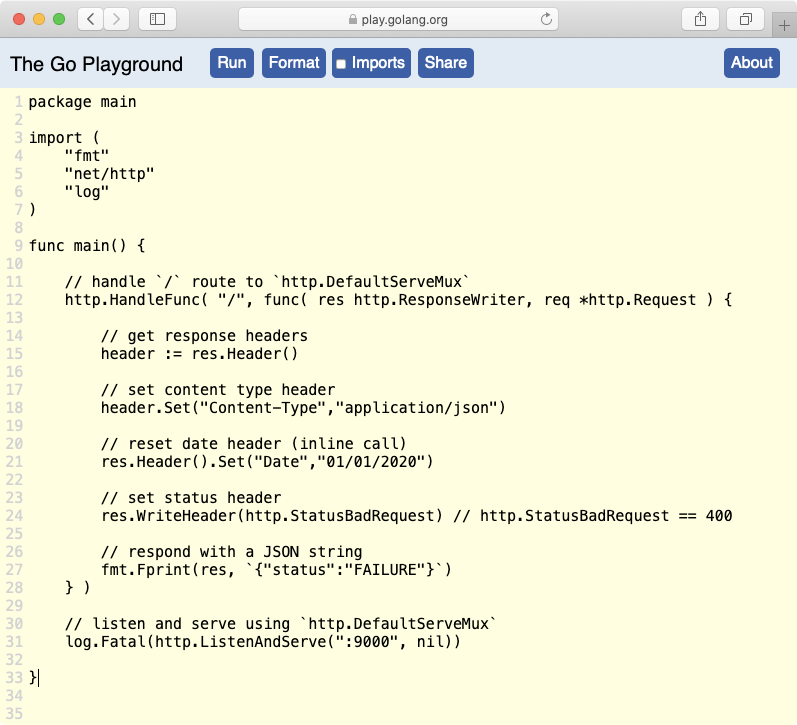
In the above program, we accessed the headers from the response using res.Header() method. We can manipulate the response headers from header object or we can make an inline call like did on line no. 21.
Then we used res.WriteHeader() method to add the HTTP status code header to the response. We could have used 400 integer as an argument but Go provide these cool constants which is more suitable.
💡 In my experience, the WriteHeader call should be followed by the Write call but after all the response headers are set.
We have also wrapped the ListenAndServe call inside log.Fatal(). This function won’t be called since ListenAndServe never returns unless there is an error. This error will be logged by log.Fatal and the process will be terminated with exit code 1.
What’s next?
We have gained a good amount of knowledge on the Go server-side architecture works and how to launch a custom Go server with default or custom HTTP response multiplexer.
The http.ListenAndServe function helps us launch an HTTP server but it’s a global server. This means we can’t have two http.ListenAndServe() calls as one call locks the process and second call won’t be executed.
On the other hand, they might share the same the DefaultServeMux which is kind of messy to manage. What we need is multiple instances of isolated HTTP servers. We will learn about this in the advanced lesson.
So far we have created an insecure server. To create a HTTPS server, we need to use http.ListenAndServeTLS function with some extra configuration. This will be part of the advanced lesson as well.
We will also look into how to read the request body, upload files, serve static content, return JSON from structs, etc in the intermediate lesson.

Creating a simple “Hello World!” HTTP Server in Go was originally published in RunGo on Medium, where people are continuing the conversation by highlighting and responding to this story.