RASPBERRY PI + NODE.JS
In this article, we are going to build a circuit of Red, Green and Blue LED lights that can be controlled from a web application using the express.js + socket.io Web Socket server.

In the last article, we understood how Raspberry Pi GPIO works and we built a couple of input/output circuits to get ourselves familiar with controlling the GPIO with Node.js. I’d recommend you to read that article first before scrolling down further as most of the key concepts are explained there.
Circuit Diagram
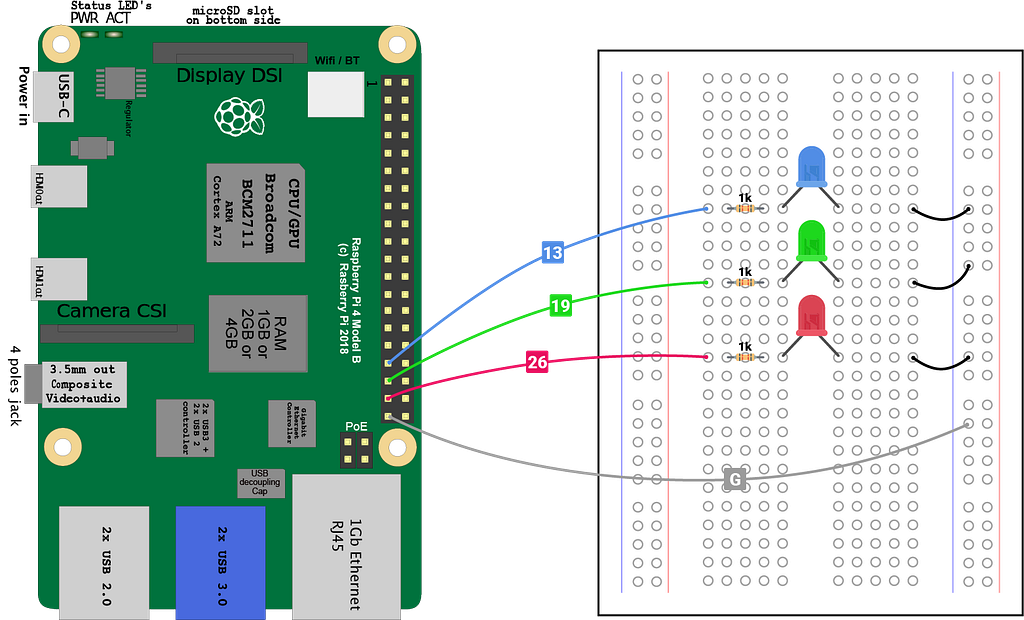
We have discussed the numbering of GPIO pins of the Raspberry Pi (Model 4B) in the last article. Following the same theory, in the below circuit diagram, we are using the BCM pin numbering system.
In the below circuit, we have three LEDs of Red, Blue, and Green color each connected to a 1k ohm register. Other ends of these LEDs are grounded. Each LED draws the power through 1k ohm register from GPIO pins.
The Red LED is connected to GPIO pin BCM 26, the Green LED is connected to GPIO pin BCM 19 and the Blue LED is connected to GPIO pin BCM 13. This circuit is very basic and if you have followed the previous article, controlling these LEDs is a piece of cake.
Project Setup
In a nutshell, the idea is to control each LED light using a web application. This web application is basically a website with three buttons, each for the Red, Green, and Blue LED light. When this website is opened in the browsers, it connects to a WebSocket server hosted on the Raspberry Pi.
When a button (on the web application) is clicked by the user, this web application sends a message (event) to the WebSocket server and the server can manipulate the state of the GPIO pins based on the information contained in this event.
First of all, we need to create some project files and install some project dependencies. Let’s create a project directory and install some npm packages.
$ cd led-iot-example && cd led-io-example
$ npm init -y
$ npm i -S onoff express socket.io socket.io-client
From the above commands, we have initialized the package.json file to keep track of our project dependencies. The onoff package provides a high-level API to communicate with GPIO of Raspberry Pi (see the previous article).
The express package provides a high-level API to create an HTTP server in Node.js to serve our web application which includes .html, .css and .js files. It will also be used to set up a WebSocket server.
The socket.io package provides an API to create a WebSocket server in Node.js. This package is used on the server-side (Node.js). However, socket.io-client provides a JavaScript file for the web application (in the browser) to communicate with the WebSocket server.
Let’s go through the application directory structure.
/led-iot-example
├── led-api.js
├── server.js
└── web-app
  ├── index.html
  ├── main.js
  └── style.css
- led-control.js file contains out GPIO logic to control LED lights. This file exports API functions for server.js such that we don’t have to bloat server.js with GPIO logic.
- server.js file contains the express server to host our web application and a WebSocket server which connects with this web application to listen for custom events sent by the web application like button presses.
- web-app/ direcory contains assets for our web application. When user opens a specific URL in the browser, index.html HTML file will be served by default. It imports style.css stylesheet to style buttons.
- main.js contains the logic to connect to the WebSocket server and listening to the DOM button click events. It is imported by the index.html.
Application Logic
Since we are done with the project setup, let’s move on to write the actual logic contained in the above files.
GPIO Setup
From the circuit diagram above, we need to control three pins, each for Red, Green and Blue LED lights. Using onoff package, we can achieve this easily.
As discussed in the earlier article, onoff package uses the BCM pin numbering system. As per the circuit diagram, we have assigned a corresponding pin number to each color of the LED light.
We have exported a toggle function that takes a boolean value for each color of light. Based on these values, either 0 or 1 is written to the corresponding GPIO which makes it output 3.3V or 0V.
Server Setup
The next thing we need is an HTTP and WebSocket server.
In the above server.js file, we have imported express and socket.io library. Since we want to control GPIO from this file, we have also imported toggle function from the led-control.js file.
First, we need to create an HTTP server which is nothing but an express application. The express() function returns such an application.
Then we need to set up a few routes to serve .html and other asset files. Using app.get( '/', handler) settings on line no. 13, anyone who accesses our web application with / URL path will get the index.html file situated inside web-app directory. We should also make sure to send correct headers.
The next thing we need to configure is to setup assets delivery. Since our index.html files needs main.js and style.css file from the web-app directory, we are using standard express.js setting to deliver assets.
The socket.io.js file is also needed in the web application to communicate with the very SocketServer we are building. This file is located inside node_modules/socket.io-client/dist directory. On the line no. 23, we are simply instructing express.js to look for the asset files inside this directory if not found inside the web-app directory.
Once our express application is configured properly, we need to create an HTTP server instance from this application. Using app.listen() call on the line no. 26, the HTTP server starts at the 9000 port of the Raspberry Pi.
The app.listen call returns the reference to the HTTP server it has started. This is the low-level implementation of the HTTP server on the Node.js. This is what our WebSocket server needs.
We create a WebSocket server using the HTTP server instance using socketIO(server) call on the line no. 29. Unlike an HTTP server, a connection to the WebSocket server is persistent. Hence, the communication between the client and the server happens through events.
The io variable represents the WebSocket server. When a client (web application) is connected to this server, a connection event is received by the server. This event contains data about the client connection like the client’s id as well as an API to communicate with the connected client only.
Once the connection is established between the server and the client, the server can emit and listen to various custom events to and from the client. Each event can contain the additional payload (data).
However, in the above example, we are just listening to the led-toggle event from the client. A client sends this event when a button in the web application is pressed. This event contains the payload which has information about the state (on or off) of the individual RGB buttons.
Based on the payload of led-toggle event, we can toggle the state of GPIO pins connected to the RGB LED lights. Since we have already written a clean API to handle that inside led-control.js file, we are simply calling the toggle function when the led-toggle event is received.
Web Application
A web application is typically just a website which provides some useful static information or a much rich user-interface to communicate with the server.
In our case, even our web application will only contain some buttons to click on, we need to communicate with the server to emit these button press events. Since we need to send these events in real-time, we are using WebSocket connection over a traditional HTTP connection.
First, we need to do is design a relatively good looking user interface.
In the above snippet, we have created the index.html file which provides a simple user interface with three buttons. I have used Roboto Condensed font from the Google Fonts server for better UI.
You should also take a look at the asset files import. Since we have configured the express server to deliver asset files from the /assets path, that’s the path we need to use in the HTML file to import assets.
The last thing remained is to code the actual client to server communication logic. This logic is written in JavaScript inside main.js file.
In the above JavaScript file, we have created references to the individual button elements in the DOM and we are maintaining the state of each (on or off) button, through line no. 1 to 9.
Since we have imported the socket.io.js file in the index.html, it provides a high-level API to communicate with the WebSocket server we have built using socket.io. It provides the io interface which is used to connect with a remote SocketServer created using socket.io.
In the above example, I have used the IP address of my Raspberry Pi device. Since we are trying to connect to a server, we also need to provide the port number of that server to make a successful socket connection.
Once the socket connection is created successfully, the connection contains the API to communicate with the socket server. As soon as the connection is made, it receives the connect event from the server. This is a safe area to initialize any connection dependent variables or send events to the server.
In our example, we are listening to the button click events and once a button is pressed, we are emitting the led-toggle event to the WebSocket server on the connection object.
The connection.emit() call takes two arguments. First is the name of the event to emit and second is the payload to send along with the event. The payload structure of the event should match the payload structure expected by the SocketServer (see server.js file).
Starting the Web Application Server and Socket Server
Now that everything is in place, it’s time to fire up the engine. The only thing we need to do is to run the server.js file with Node.js. We do that using the below command.
$ node server.js
Once you execute this command, it will start an HTTP server on port 9000. It will also start a WebSocket server but this server also runs on the same port. We can open http://<rpi-host>:9000 URL in the browser to access the web application we just built.

Once you open this web application, it will get connected to the WebSocket server. You can add additional logs to main.js (inside connect and disconnect events listeners) to check if the socket connection to the server is made successfully or not.
However, if you see the logs printed by the server.js, you should see a log message displaying the id of the connected socket client.
Express server started!
SOCKET:  A client connected XaOGSG9KlEDul37hAAAA
If you see this message in the terminal where node server.js command was executed, then the client-server communication is established. Now you can press on the Red, Green or Blue button in the web application and your Raspberry Pi should toggle the LED lights just fine.

Improvements
You can make a lot of improvements to the model we have just created.
- When a socket connection is made, read the state of the RGB pins on the Raspberry Pi so that the client and the server have the same state. You can achieve this by sending an event from the server to the client with the state of the LED pin as the event payload.
- If you are working with a device that needs higher current or voltage, then supplying power directly from Raspberry Pi is stupid. In that case, you can use a relay switch. Here is a great video on relay switch.
- The web application we designed in this tutorial works only when both our server and client are on the same network. You won’t be able to toggle LED lights from another city. You could create an intermediate public soket server (with some authentication) that relays the events from a client to the Raspberry Pi server which is always listening to it.
Why a WebSocket server?
We are very well aware of HTTP communication. When an HTTP request is sent by the browser, the browser responds to this request with some data. Once the data is received by the browser, the connection terminates.
Hence, for every request, we are creating a new HTTP connection which takes some time to establish and also contains some meta-data like Header fields and payload. Sending an HTTP request is a heavy and time-taking process.
A server can not send a client some data unless the client asks for it. Hence, HTTP is a stateless unidirectional communication protocol and not meant to be used for bidirectional real-time communication.
In contrast, a WebSocket connection is a full-duplex bi-directional communication protocol. Once a web-socket connection is made, it remains open until the client or server closes is deliberate. Once the connection is established, a client or server can send events to each other.
A WebSocket connection is an Upgrade over an HTTP connection. Hence, a client first sends an HTTP request to the HTTP server with Connection:Upgrade and Upgrade: websocket request headers.
Then it is the responsibility of the HTTP server to establish a WebSocket connection on the same TCP connection. Once the connection is established, the server can not send events to the client or listen for events from the client.
Not all browser has support for WebSocket communication protocol.
To achieve fully-duplex communication using just HTTP protocol, we had to come up with the long-polling mechanism where an HTTP connection is remained open for a long time until the server has some data to send. But Long-polling is one of the worst ways to achieve fully-duplex communication and it is very inefficient.
But most modern browsers now support the standardized WebSocket protocol and also provides the JavaScript Web API natively.
However, socket.io and socket.io-client together provides a fail-safe mechanism to achieve a fully-duplex mechanism using long-polling when WebSocket protocol is not supported by the browser.
Most of the jargon of upgrading an HTTP connection to the WebSocket connection is done by socket.io itself. Since the WebSocket connection is an upgrade over the HTTP connection, we need to create an HTTP server first.
In this article, we have created the HTTP server using express package. However, you can use http or https built-in packages of Node.js to create an HTTP or an HTTPS server. The socket.io adds a /socket.io route to the existing HTTP server where all communication between will take place.
Apart from sending simple events, socket.io have a rich API to manage connection namespaces and rooms. You should take a look at their documentation to know more.

Introduction to IoT with Raspberry Pi and Node.js using RGB LED lights. was originally published in ITNEXT on Medium, where people are continuing the conversation by highlighting and responding to this story.